10.31.2011

Azriel's [birthday] costume!

Today being Halloween and all... I thought I could at least showcase our daughter's fun outfits I've sewn for her birthdays (oct.29th).  It's a fun way to dress her up without dragging her out the night of all the ghouls and zombies!


Last year, for her 1st birthday, she was a Narnian fawn (think Mr.Tumnus). I sewed a brown wig onto one of her bonnets and attached felt ears and fawn horns.  An old striped shirt made for the red scarf, and pants were sewn from faux fur... as well as vinyl brown 'hoof' slippers.


This year (since we still love the woodland theme) she was a gnomish.mushroom girl.  I made the hooded cloak from an old pair of Ben's corduroy pants.. (detail: wooden apple buttons).  The skirt was sewn from fun polka dot fabric with yellow underneath... and extra patches.  A great outfit to cook at her new birthday oven I crafted for her!


The only good shot of her 'acorn hat' I made.. is in this balloon dance video!
The wonder of a balloon kept this gal's spirits high all day.
*****
Bloopers from 'pre-production' of Azi's costume:
Every flippin' time I tried to put the fabric out to sew... Tinderpuff was right there to gladly lounge on it (should have made her a mushroom skirt).
I'm convinced these cats are trained to hear the first signs of me getting ready to sew.. and pounce!

Hmmm.... a tempting hat for mama instead?  Or not.

All in all, another fun year of dressing my birthday girl up.  Just think how excited she'll be in the future to have all these pics come back to haunt her. 

What are your kiddies dressing up like?
Have a safe, cozy night!

Mel ;o)

10.30.2011

slide.show.sunday.take 19.

Hello friends!  Another beautiful weekend has come and gone... and here's the slide show to help me remember the birthday blur for our daughter Azriel!  I managed to work through a pesky head cold (really just felt like my nose was stuffed full of water balloons set to 'leak').  Overall a fun.festive.Fall weekend.. enough talk - here's the pictures!

Birthday 'woodland picnic' snacks for all.

Azriel was dressed as a woodland gnome.mushroom girl I sewed for her - and loved her toy oven I made!

We tried to pack as many of Azi's wee friends (and our bigger ones) into our living room.  She adored having everyone around to celebrate!

We also adored all the wee gnomes that showed up... even a newborn one...awww.

Azi loved handing her mushroom rattles out to her friends... from her pumpkin bag.

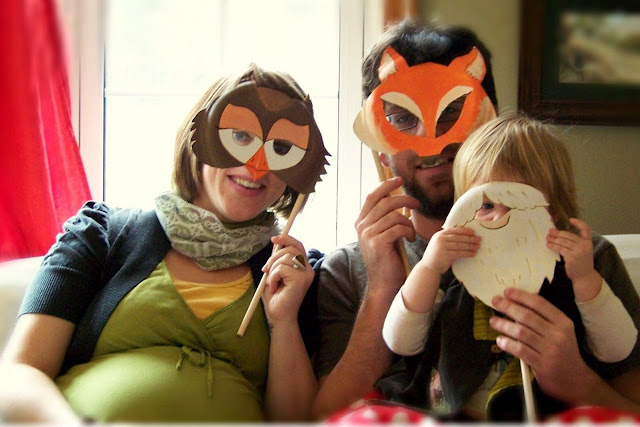
One hoot mama. foxy papa... and um, bearded birthday girl.  (I was tempted to put a gnome hat on the 'little brother' hiding in my big belly).

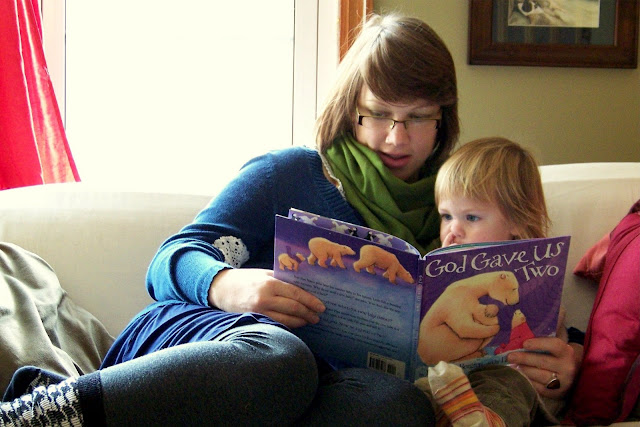
Once the party was over... we settled in for afternoon snuggles.  Reading our new book about an 'addition' coming to the family too.... 
A quiet evening spent home for once (Saturday family dinner cancelled due to sick Mama-in-law).  We watched the new Winnie the Pooh movie ... so cute! 

Sunday after church we headed out into the sunshine at the zoo.  The lemurs were particularly festive and friendly.

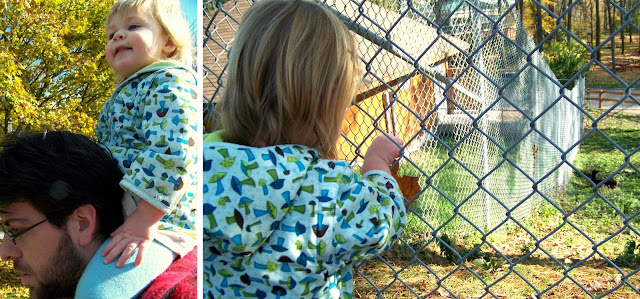
Since we couldn't ride the camels, Azi settled for Dad.  She also thought each animal at the zoo would appreciate being fed a leaf.... sadly, no deal.

A beauty weekend here (despite sniffles) and we are blessed with a terrific.two.toddler here.

Hope yours was beauty too.. what did you get up to?
Lots more party pics and fun coming at you this week,
take care,
Mel ;o)

10.28.2011

D.I.Y ~ fabric mushroom rattle

Ok, so here's another sneak peek (and do.it.yourself project) for my daughter's upcoming 2nd birthday!  I wanted to sew plush lil' mushroom rattles for her to give all her wee friends (a token birthday 'favour' if you will).  I looked around the internet and didn't find any ideas I liked... so I just whipped up my own pattern/design for making 'stuffed mushrooms'!  If you're just as mushy for shrooms as me.. you may enjoy this easy project:

I'm sorry I don't have an official printable pattern for you.. but the shapes are simple enough to copy. The size of each pattern piece is around 3" (diameter, and length for the stem). 
 
Supplies needed:
Toadstool Mushroom fabric:: red.white polka dot cotton.
Mushroom Cap (under side):: yellow felt/fleece.
Mushroom Stem:: tan felt/fleece.
Stuffing
Bells
Sewing Machine
 Once you've cut your fabric...  1) Fold the stem in half and sew up the side - leaving top open.
2) Polka dot mushroom cap gets folded and sewn up the side as well (making the cap shape).
3) While still inside out, tuck the yellow fleece into the cap and sew it around (shown above) - leaving a half inch gap (shown below).

This gap allows you to pull the mushroom cap right side out.  Stuff it.  Then slip a bell in through the hole and position in within the centre of the cap.

Stuff the mushroom stem full as well (once you've turned it right side out). I find a glass or plastic chopstick works great for stuffing these wee projects.  Then hand stitch your cap fully closed and sew the stem to it's underbelly.  You're done!

Shake.rattle. and roll those sweet lil' toadstools!

I'm sure you'll see more pictures of these when Azriel hands them out to all her friends this weekend.  They really were simple and fun to make.  A great baby shower gift for any gnomes in your life!
wild for woodlands,
Mel ;o)

10.27.2011

red riding hood...

We found this sweet lil' red riding hood in the woods last weekend... and decided to bring her home with us.  We found out she's turning two this Saturday.. so in keeping with her natural habitat, she'll have a woodland birthday!  Tune in next week for her adorable outfit post! ;o)

We're still trying to savour every snap.crackle.pop of the Autumn leaves here.. this season always seems so fleeting - maybe that's what makes it extra special.

Azriel wears:
red jacket::thrifted (George)
striped sweater::thrifted (Old Navy)
blue velvet skirt::hand-made by our friend.
purple stockings::thrifted
hiking shoes::Payless Shoe Store.

Linking up with the lovely Morgan over at Small Style today!

Have a beauty day!
P.S... another fun d.i.y coming at you tomorrow!

mama in the hood,
Mel ;o)

10.26.2011

D.I.Y - upcycle furniture into kid's toy oven.

Psssst!  Can you keep a secret?  Here's my 'labour of love' creation I've made for our daughter's second birthday this weekend!  I've been planning this gift (and tutorial for you) for a while now.. and am excited to show it complete!
If you, like me, fear a house being overrun with plastic toy imitations of all your 'adult appliances'.. you may enjoy this do.it.yourself way to create toy station/play areas.
You will need a wooden side table/small dresser... anything you can envision upcycling!
Plus a variety of other creative accessories I'll show you below...

We cut a hole into the top of the cabinet - that a steel lipped bowl could fit into.
My sweet father-in-law even installed an old faucet as a plus! 

If you choose to paint your piece, a good oil primer will seal any varnish.
I wanted to paint ours a retro avocado green.  I then sanded/distressed the edges to give it an already 'worked in' appearance.

A thrifty way to make the stove top burners/elements is to use frozen juice lids.
We just happened to recently pitch out our oven (you may remember that stinky scenario) so I had the oven dials I could use (if you fill the dial holes with hot glue and then jam them onto extended nails... they'll hold and spin without coming off).

One side of the oven has hooks for holding towels/oven pads.  The other side has chalkboard paint and a ledge for chalk (stole from a Scrabble game).  I also sewed some quick curtain panels for the front hole to hide her wood bowls and cooking pots.
Of course I had to paint mushrooms on the oven too, since it is her woodland themed birthday this weekend!

Fun eh?  I had a hoot creating this.  Hope it inspires you to see some old furniture in a new way too!
Happy upcycling!
bun in the oven mama,
Mel ;o)

P.S - today we're linking this d.i.y up with others at Hope Studios!

10.25.2011

laced with love.. con't.

Hello friends, just wanted to show you the conclusion post to where those commissioned neck.laces ended up.  You may remember me posting about the fun creating these special pieces for a cool couple's wedding party...

Detail of one of the six neck.laces I was commissioned to create.

All the lovely models!  The two younger ladies wore wrist.lace cuffs I made for them.

The 'Glow.ing' couple!  Congrats again to Chris Nickle and Shaunacy King!
The dashing duo that run Glow maternity here locally (where my bird mobiles like to nest).

Thanks to Ash Nayler Photography for providing some stunning peeks at a beautiful day here.
If you want someone to capture a special day in your life.. this is the photographer to go to, she's got mad skills (and she's cute too).

This seems to be the week brought to you by 'lace',
but rest assured there are more d.i.y's to come (without lace!) this week,

Mel ;o)

10.24.2011

D.I.Y - upcycle t-shirts & lace into scarf.

If you're anything like me, you may have an affinity for the 'infinity style' scarf (a glorified loop of fabric).  I've been plotting the use of a t-shirt and my love of lace into such a creation... and this look on pinterest got me more motivated!  If you want to make my quick.easy version by upcycling a t-shirt & lace... here's a wee tutorial for you:

1. Grab yourself a t-shirt and about a 2' long strip of lace.

2. Now you're going to cut a large square out of the body of your t-shirt (front & back).
3. Fold down the length of the shirt and then cut (making 4 long strips).

4. I cut the t-shirt to the size of the lace strip (7"x22").

5. Lay your lace onto the right side of one t-shirt strip. 
Facing all the t-shirt 'right sides' together, then stitch the edge on your sewing machine to attach all the pieces together.
I found using only 3 of the 4 t-shirt strips to be plenty long enough for the loop.
(You want to be able to hang it from the top of your head down to your belly button)

And voila!  The great thing about t-shirt material is you don't have to hem the edges.. just stretch the shirt so it curls the edge under.  This also makes the scarf long enough to wrap around my neck three times for a snug look.
***

For an other approach:
Use three strips of t-shirt (seen here in cream colour).. and two thick bands of lace.


Hope you found that helpful to inspire a do.it.yourself thrifty version of the infinity scarf!

Enjoy,
Mel ;o)

10.23.2011

sunday.slide.show.take 18.


It's that time of the week again... a flurry of pictures to show a glimpse of our weekend here:
I can't get enough of this season... each leaf a glowing ember against the cobalt sky.

On Saturday birthday candles were all aglow... we threw a BIG 60th birthday for my Dad.
Azriel here was delighted to hold the balloons! 

Lots of pictures, friends, family and food gathered to celebrate Dad... we kids even got up and gave speeches (you'll be glad to know the pictures were too blurry to show you!).  Azi found the best place to 'eavesdrop' was under the tables...

Sunday morning... getting ready to head to church on a beautiful fall day.

Family hike in the afternoon to Burnham woods... we love crunching through all the leaves!

Azriel got all 'crunched' out... so Ben got to snuggle her back up the trail.

Here's what '6 months pregnant' is looking like here by the way.

We ended the outing by intentionally getting lost in the countryside again.
Can I just recommend this to any and all of you?  There's nothing more beautiful than to just 'drive' with no real game plan but to enjoy the countryside.  Azi and I 'mooed' and 'neighed' at the animals along the roads.... Ben navigated our way to eventually get us back home.  It's a fun escape from the city for us ~ since more and more we long for quieter pastures.
Hope you all had a lovely weekend too friends.
(You may be happy to know that in light of Friday's stinky incident... we have another oven to be installed this week hopefully!)
Lots of d.i.y's coming at you this week - stay tuned!

Mel ;o)

10.21.2011

where there's smoke...

Today was one of those days.  You know the one... everything is going swell, a smile can't evade your lips, you find yourself humming cheerfully...  and then - that one moment that turns it all upside down.
So here was our scene today:
I was contentedly squashed into my 'temporary' sewing corner at the dining table (working on my daughter's birthday/halloween outfit).  Ben came and snagged a picture of me in my element... 

... so then I snapped a shot of him in his element: the kitchen... eager to bake some cranberry/orange scones in our newly installed oven!
(Back story: we have been without a working oven the ENTIRE summer folks.  Having a bbq helped, but you can only fry up so much... and this baker man was eager to get an oven hooked up.  We just couldn't rub two pennies together most of the summer to afford installing the switch-over to a gas stove.  Yesterday the BIG day, we finally got the oven installed...)

... all seemed so lovely.  Me happily sewing, Ben happily prepping the scones to bake.  The oven was pre-heating... and then the smell started.
"Wow, that really is starting to smell" I commented.
"Maybe it's just because it's the first time firing it up" Ben thought..
....
"Ok, that is REALLY starting to smell (cough, gag)" I sputter
"....yah.... it stinks actually'...
Oh gosh, did mice get in that oven while it was in the garage all summer??!
Oh gross, mice got in that oven!
It reeked like an old age home set ablaze... that awful urine.feces smell set to 'bake'!

I opened all the windows and ran outside for fear of inhaling some toxic mouse bio-hazard.
Azriel was still napping safely upstairs.

Having waited all summer.
Having the hope of warm homemade scones.
Fresh bread, real cooked food again... all destroyed in that moment from mice...
we're feeling pretty discouraged here at the nest.

***
We've abandoned the stinky house to our cats (if any broiled mice try to escape they'll find another end in those felines).  Camping out at the in-laws tonight, who graciously were cooking up a large turkey!

So that's our 'sob story'.  I know it's a 'first world' problem, and we'll figure out a solution sooner than later (hopefully).  I just thought I'd rant about it here, in case you thought we 'had it all together' and life seems rosy here most days... no, we still hit that wall now and again, shake our fists at the heavens, and wonder 'why us'... all those human moments.

*Remember kids: never store an oven in a garage where mice will seek out and destroy.
Be thankful for family who provide a sanctuary in the face of despair.
Keeping cats around does have it's advantages too.

Anticipating a better weekend ahead, hoping the same for you!
Mel ;o)

10.20.2011

D.I.Y - doily toddler shirt

Yes friends today is the 'cuter version' of how to upcycle your doilies... since our last post covered stitching them onto the 'big mamas' sweater.  My gal Azriel is in a particularly adorable frame of mind to show off this sweet addition to her striped onesie.

Who could resist those puppy eyes.. c'mon really?
Maybe she learned it from her mama since this is the look I give Ben when I want chocolate.

So here's the super fast.stupid easy.tutorial (you know, my specialty of do.it.yourself projects!)
Grab your granny's doily, grab your daughter's onesie/shirt.

1. Fold doily in half over the collar of shirt.
2. Run a zig-zag stitch border around the doily (seen in red above).

That's it!  That's quick!
(I didn't even trim the doily inside the shirt.. it adds a good backing/stiffness to the shirt front.)

Now the key is restraint to not add these to all her shirts!
Azriel is wearing:
Upcycled onesie: mama-made.
Jeans: Zellers

For more cuties wearing fun threads... check out Small Style over at Mama Loves Papa's blog.

the diva of doily d.i.y's,
Mel ;o)